
Welcome back friends! Reunion week has come and gone and we’re back with another long-distance, side-by-side bake this Sunday. Since we’ve made the Flaky All-Butter Pie Dough so many times already, this latest recipe from the Pies and Tarts chapter allowed us to check off just one new one from Claire Saffitz’s Dessert Person. Bake number 34 on our journey was the Quince and Almond Tart with Rosé.
Lauren’s Take

We’re almost done pies and tarts! Which is equally exciting and bittersweet. Pies and tarts has been such an excellent chapter and it has been very comforting being in my baking sweet spot. Nonetheless, change and challenge are good things and I look forward to the different desserts ahead.
But while we’re still in pies and tarts land—this week we made the Quince and Almond Tart! I learned a few things this week from this bake:
- I pronounce quince way too fancy and incorrectly so every produce grocer had no idea what I was saying (I have since learned the correct pronunciation).
- Almond paste is super expensive to buy and very easy to make yourself, so just do that.
- I have become a master at the Claire Saffitz pie dough and I am not ashamed to say it proudly.

The main snag we hit this week was neither of us could find quince. Julia gave me the suggestion of using Asian pears instead so I went with that! Julia suggested adding lychee to get a closer flavour match; I had considered adding some pineapple juice to the recipe to get the quince flavour Claire describes but forgot, so I ended up just doing a rendition of this recipe using Asian pears instead. They worked out super well and I was really pleased with the taste. So don’t fret if you can’t find quince!

This recipe involves four elements that are each slightly time consuming, so I opted to make all the elements on one day, and then assemble the tart and bake the next day. The first is to make either the pie dough or rough puff; I chose to use the pie dough and please see point #3 to see how I feel about that 😉
The next thing I did was make the almond paste, which again, was very easy to do. You simply mix almond flour, powdered sugar, egg white, and almond extract in the food processor until it comes together and chill. Easy and delicious.

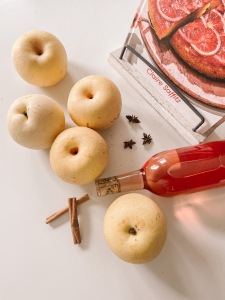
Then I made the poaching liquid and poached the pears. This poaching liquid smells amazing and I was very tempted to just ladle some out and drink it like mulled wine. It’s a combo of rosé wine (full bottle cause that’s how we do), sugar, lemon zest, lemon juice, cinnamon, and star anise. Once the sugar has dissolved, you remove from the heat and prepare your pears. To do this, you peel the skin away, core them and slice in half…and keep all these discard pieces in a bowl (this will lead to a magical moment, stay tuned). Once your pear halves are ready, you put them in the liquid, topping up with water until the fruit is submerged. Claire recommends putting a piece of parchment paper and a small plate on top of the liquid to keep the fruit under the liquid. I did it because I’m a purest, but I don’t know if it’s the most necessary thing!

My pears poached for about 25 minutes to get to a good level of tenderness. After you remove the pears, you add your reserved pear skins and cores to the fluid and bring to a boil. This was the most magical discovery of the book so far; the natural pectin from the fruit MAKES THE LIQUID INTO A JELLY. I’m sorry…what?! Mind blown. You reduce this mixture until it is thick and bubbles are slow to pop; the book says 20-25 minutes but it took me about 40 minutes to really get there. I think it may have been because I had to add quite a bit of water initially to cover the fruit. You then strain this liquid, discarding the solids. You should get about 2/3 cup of liquid; mine was slightly less and you can totally get away with that. You leave this mixture in the fridge to chill and become a jelly, letting the pectin work its magic!

The next morning, I had all my components and was ready to assemble! This recipe is basically tarte tatin with pears so it was comforting to already know the techniques. In the cast iron, you layer the chilled jelly, thin slices of Asian pears, rolled out almond paste, and your pie dough. And then bake until golden brown!
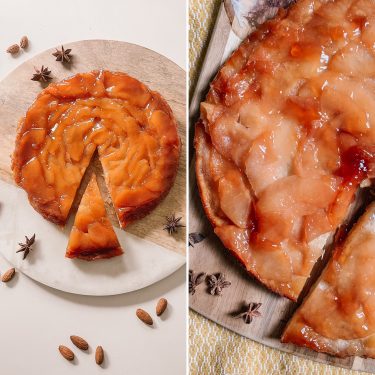
The flip of the cooked tart was a lot less terrifying this time so worked out super well with very little spillage. Leftover jelly glazes the warm tart after being removed from the oven and then you’re done! The result is a tart with the deepest golden colour and shiny top! It looks so inviting and beautiful.

This tart tastes great—so many layers and textures and flavours. The pie dough was super flaky because I’m a champion. The almond layer is very rich and savoury, and the poached fruit with the jelly has a sharpness and sweetness to it. When the components balance well, it’s a perfect bite. My only qualm is I think I should’ve used less almond paste or done a thinner layer because it did tend to dominate the flavours. But otherwise, it is delicious, not too heavy, and a pretty ideal summer dessert. 4.5 stars for me!
Julia’s Take

Back to individual baking this week! Honestly, if there was a recipe to tag-team with a baking buddy, this would have been a good one because there were so many steps, pauses, techniques. Alas, Lauren is back in Ottawa and I had to ride solo again on this one. I broke the process down over a couple of days which helped, but it still took a long time to bring together this seemingly easy recipe—partially cause of the instructions in the recipe itself and partially my own doing.
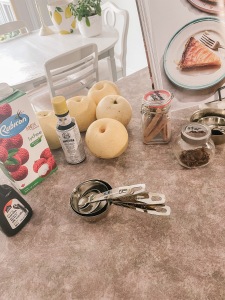
There were four basic components to this tart: the Flaky All-Butter Pie Dough, the almond paste, the poached fruit, and the fruit/wine jelly. I made basically all of these the day before, left them in the fridge overnight, and then put the whole tart together the following day. The pie dough was a real highlight for me with this bake; I have loved Claire’s recipe every time I’ve used it so far but I have noticed that, even though it always comes out flaky and delicious, it’s always a bit tough to cut through with a fork. After reading some tips from fellow Dessert People on Instagram (shout-out to Karen if you’re reading this!) and after making the dough with Lauren in person last week, I realized I was probably adding too much water—so I resisted the temptation this time and my pie crust has NEVER turned out better! One of the best parts of this project has been noticing a gradual improvement in my skills, knowledge, and confidence as a baker and this was a top moment.

Once the pie dough was ready and chilling in the fridge, I moved on to the poached pears. Now, you might be thinking: “This is called a quince tart. What is quince and what’s with the pears?” Well, I had never heard of quince in my entire life but apparently it’s a pear/apple hybrid that has some tropical undertones. They are native to Western Asia/Eastern Europe, and remain quite hard which I guess is what makes them appropriate for slow, long cooking processes like poaching. From the description in the book, it sounds like Claire is a big fan but there was no way I was finding this ingredient in my small northern Ontario city, especially in the summer, so I had to get creative.

I decided to sub the quince for Asian pear which, to me, would have that similar apple slash pear vibe and a good enough crispness to maintain its integrity during the poaching and baking process. I also decided to add some lychee juice to the poaching liquid since I’d heard that the tropical hints in the quince flavour were similar to lychee. Never having tried quince, I have no idea if this worked; I’d love to try the true-to-the-recipe version of this tart and compare the flavour to what I got, but I don’t see that happening so I’ll just say I’m brilliant and I nailed it 😉

The poaching liquid is made up of a full bottle of rosé wine (I’d actually bottled some myself this summer so I was able to use that!), sugar, a cinnamon stick, star anise, the rind and juice of a whole lemon, vanilla, and in my case of course, the lychee juice. The pears are peeled and cored, cut in half, and then simmer in the liquid for about 25 minutes until softened. Water is added until the pears are just covered as well. Having read that quince is very tough, I was worried about my pears over-poaching so I veered on the side of slightly firmer; I was able to poke through the flesh easily but they still had structure to them. At this point, you need to turn off the heat and let the pears sit in the liquid for a little while until the liquid cools from hot to warm. After THAT, the pears are removed from the liquid and the pot is brought back up to a boil. That was a common theme with this recipe: heat on, heat off, heat on, heat off. Was it necessary? Probably not. But who am I to argue with Claire.

Speaking of unnecessary steps, the recipe says to place a circle-shaped piece of parchment paper over the pears and place a small plate on top to make sure the fruit remains submerged in the poaching liquid the whole time. Did this actually make a difference? I’m not so sure. It was hard to see how much the liquid was actually simmering and how soft the pears were getting, so I took everything off about halfway through the poaching process and they still seemed submerged enough to me. For anyone reading this who plans to make this recipe, I’d say save yourself the piece of parchment and don’t bother with this.

As you bring the poaching liquid back up to a boil, all of the reserved pear skins and cores are added back in. I really loved this aspect of the recipe! I thought it was so cool that what would be considered the “waste” was actually reused and served an important function. Since the skins of the fruit have natural pectin in them, boiling them in the liquid helps to thicken it and ultimately turn it into a jelly. How amazing is that?? Is it just me that nerds out on this stuff?

This stage is where I ran into some snags, friends. Like the dough and the pears, I decided to finish up the jelly component the night before—but it did not go according to plan. I added the skins, brought everything up to a boil, and let it go for about 25 minutes like the recipe called for. Important warning: DO NOT WALK AWAY. I’d looked at the liquid once or twice and noticed it was turning into a syrup so I went on my merry way and waited for the timer to go off. Eventually, I started to smell something burning. Do not ask me how it went from zero to 100 so quick, but the liquid had reduced WAY too much and the bottom of the pot had completely burnt. There was still syrup though, so I naively thought: this could still work. I strained my syrup, put it in the fridge, and hoped for the best. Later that night, I found a dark brown, sticky, almost completely solid mess—aka not the pretty pink soft jelly you’re supposed to have, so I tossed it and went to bed.

Day two (told you that was an involved bake): I hit up the grocery store first thing to buy more pears and went through the whole poaching/reducing process a second time. I kept an extremely close eye on it, kept the heat slightly lower, and stirred very often. After 45 minutes, I had something that was maple syrup consistency, strained, and left it in the fridge to cool for about an hour. When I went to check on it, it was jelly! Success! And so cool.

The last component I had to worry about was the almond paste. Apparently this is actually different from marzipane, and after looking around it was clear that I would NOT find this in the grocery store and it was shockingly expensive to order online. I remembered reading that another Dessert Person had made her own using a recipe from Wild Wild Whisk; it looked easy and I already had all the ingredients so I just went for it. It only takes about 5 minutes—add almond flour, powdered sugar, salt, an egg white, and some almond extract to a food processer, blend until smooth, and then wrap and store in the fridge until firm and ready to use.
FINALLY, I was ready to assemble. Spread most of fruit/wine jelly into bottom of cast iron skillet lined with neutral oil and parchment—done. Cut poached pears crosswise and create pretty design over top of jelly, slightly overlapping—done. Roll out almond paste into 9-inch circle and carefully place over pear slices—tricky, but done. Roll out pie dough into 10-inch round and place over the other tart components, using a spoon to tuck in the sides just like you would for a Tarte Tatin—done. Cut some slits into the dough to help release steam, and then bake. Similar to some of the other pies and tarts, this one bakes at 425 for the first 20 minutes, and then at 350 for the rest of the bake time. It comes out golden brown with the jelly bubbling up around the edges.

You’d think at this point, the hard part is over—but no. We have another adrenaline-inducing hot skillet over the sink flip a la Tarte Tatin here. A tad stressful but otherwise successful flip and reveal. The remainder of the jelly gets brushed over the fruit and wow is this tart ever pretty!! The pink glossiness of the jelly, the rose design of the pear slices, and the curled up edges of pastry all make for such a unique and appealing finish. I also loved how thin and delicate this tart was—it all looked so elegant.
In terms of flavour, it wasn’t like anything else I’d had. I was SO happy with how my crust turned out—perfectly crisp and cut like a dream. The flavour and texture of the pear was great and, I don’t know if I was just imagining it, but there was definitely a touch of tropical. You don’t get an outright flavour of “wine” but there is something slightly sweet, subtle, and aromatic about the glaze thanks to the rosé and poaching spices, and the layer of almond adds a nuttiness that pairs so well with the fruit. The first bite was surprising, and I liked it more and more as I continued to eat. I’m not sure I’ll be itching to repeat this whole process again any time soon, but it’s a tart I’d happily eat again. 4.5 stars!

Only three recipes left in the Pies and Tarts chapter! Join us next week for the Blueberry Slab Pie.
